기존 다루었던 두 개 프로그램을 이용하여 원격에서 웹을 통해 sg90 서보를 동작시키는 프로그램을 설명한다.
'와이파이를 이용한 웹 서버 운영 (4) ESP32 프로그램 개발' 읽어보기 >
'SG90 서보 모터 제어 (3) ESP32 프로그램 개발' 읽어보기 >
프로그램 개발을 위해 준비해야 할 내용은 아래 글을 참고한다.
개발 환경 설정 (1) ESP32 프로그램 개발 읽어보기 >
이 프로그램은 ESP32의 Station 모드 WIFI 환경에서 웹 서버를 운영하는 기존 프로그램에 Get 요청에 따라 ESP32에 연결된 서보를 동작시키는 기능을 한다. 웹 서버와 서보 동작은 위 두 프로그램의 내용을 그대로 사용하였다.
서보 동작을 MyServo(int dir) Fuction을 사용하여 웹 서버의 Get 요청의 파라미터에 따라 다른 방향으로 움직이도록 하였다. Get에 /H가 입력되면 MyServo(0), /L이 입력되면 MyServo(1)을 호출한다.
// ESP32HTTPServo - ESP32 Servo control through HTTP
// by NDoLab 2024/9/17 in place 2024/9/17
#include <WiFi.h>
#include <ESP32Servo.h>
Servo myservo; // create servo object to control a servo
int servo =0;
int servoPin = 23;
const char* ssid = "your ssid";
const char* password = "your password";
NetworkServer server(80);
// servo control function
void MyServo(int dir){
int pos =0;
myservo.write(90);
if(dir==0){
for (pos = 90; pos <= 180; pos += 5) { // goes from 0 degrees to 180 degrees
// in steps of 1 degree
myservo.write(pos); // tell servo to go to position in variable 'pos'
delay(100); // waits 15ms for the servo to reach the position
//Serial.print("move left.\n");
}
for (pos = 180; pos >= 90; pos -= 5) { // goes from 180 degrees to 0 degrees
myservo.write(pos); // tell servo to go to position in variable 'pos'
delay(100); // waits 15ms for the servo to reach the position
//Serial.print("move right.\n");
}
}
if(dir==1){
for (pos = 90; pos >= 0; pos -= 5) { // goes from 0 degrees to 180 degrees
// in steps of 1 degree
myservo.write(pos); // tell servo to go to position in variable 'pos'
delay(100); // waits 15ms for the servo to reach the position
//Serial.print("move left.\n");
}
for (pos = 0; pos <= 90; pos += 5) { // goes from 180 degrees to 0 degrees
myservo.write(pos); // tell servo to go to position in variable 'pos'
delay(100); // waits 15ms for the servo to reach the position
//Serial.print("move right.\n");
}
}
}
void setup() {
Serial.begin(115200);
pinMode(5, OUTPUT); // set the LED pin mode
delay(10);
// set up servo
myservo.setPeriodHertz(50); // standard 50 hz servo
myservo.attach(servoPin, 500, 2400);
// We start by connecting to a WiFi network
Serial.println();
Serial.println();
Serial.print("Connecting to ");
Serial.println(ssid);
WiFi.begin(ssid, password);
while (WiFi.status() != WL_CONNECTED) {
delay(500);
Serial.print(".");
}
Serial.println("");
Serial.println("WiFi connected.");
Serial.println("IP address: ");
Serial.println(WiFi.localIP());
server.begin();
}
void loop() {
NetworkClient client = server.accept(); // listen for incoming clients
if (client) { // if you get a client,
Serial.println("New Client."); // print a message out the serial port
String currentLine = ""; // make a String to hold incoming data from the client
while (client.connected()) { // loop while the client's connected
if (client.available()) { // if there's bytes to read from the client,
char c = client.read(); // read a byte, then
//Serial.write(c); // print it out the serial monitor
if (c == '\n') { // if the byte is a newline character
// if the current line is blank, you got two newline characters in a row.
// that's the end of the client HTTP request, so send a response:
if (currentLine.length() == 0) {
// HTTP headers always start with a response code (e.g. HTTP/1.1 200 OK)
// and a content-type so the client knows what's coming, then a blank line:
client.println("HTTP/1.1 200 OK");
client.println("Content-type:text/html");
client.println();
// the content of the HTTP response follows the header:
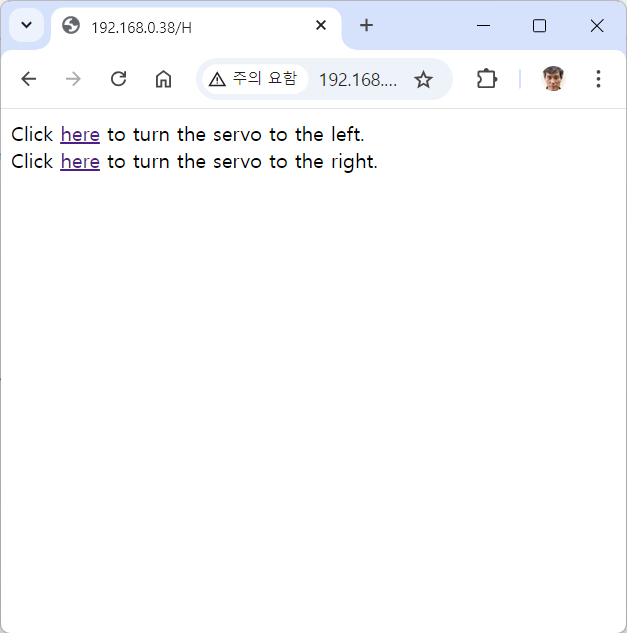
client.print("Click <a href=\"/H\">here</a> to turn the servo to the left.<br>");
client.print("Click <a href=\"/L\">here</a> to turn the servo to the right.<br>");
// The HTTP response ends with another blank line:
client.println();
// break out of the while loop:
break;
} else { // if you got a newline, then clear currentLine:
currentLine = "";
}
} else if (c != '\r') { // if you got anything else but a carriage return character,
currentLine += c; // add it to the end of the currentLine
}
// Check to see if the client request was "GET /H" or "GET /L":
if (currentLine.endsWith("GET /H")) {
MyServo(0); // Turn servo
}
if (currentLine.endsWith("GET /L")) {
MyServo(1); // GET /L turns the LED off
}
}
}
// close the connection:
client.stop();
Serial.println("Client Disconnected.");
}
}프로그램을 upload 한 후, 전원만 공급하면 웹서버가 작동되며, 웹을 통해 모터를 동작시킬 수 있다.

2024 NDoLab
2024/9/21 처음 2024/9/21
systems/trip/grip/esp32/ESP32HTTPServo.ino
728x90
'스마트커넥티드 > ESP32' 카테고리의 다른 글
| XIAO ESP32-C3 개발 환경 (2) AI CAM 응용 (0) | 2025.09.16 |
|---|---|
| XIAO ESP32-S3 sense에서 AI 모델 구동하기 (1) AI CAM 응용 (0) | 2025.09.16 |
| 와이파이를 이용한 웹 서버 운영 (4) ESP32 프로그램 개발 (0) | 2025.09.16 |
| SG90 서보 모터 제어 (3) ESP32 프로그램 개발 (0) | 2025.09.16 |
| Hello world 프로그램 (2) ESP32 프로그램 개발 (0) | 2025.09.16 |


